Category

Tips

How to set up a neighborhood Facebook group to cope with Coronavirus

By Tips

There is no IN 30 MINUTES guide about Facebook and I never write about the social network, but today I’ll be making an exception. That’s because Facebook has a chance to shine in the current Coronavirus health crisis, as a place for neighbors to come together in hyperlocal Facebook groups. This post will show how to set one up.

Because Facebook is so widely used (around 70% of U.S. adults have accounts, and three in four use the site daily), small Facebook groups for individual streets or small neighborhoods can serve as a virtual gathering spots while people are quarantined or practicing social distancing. Through these groups, residents can marshal support and resources for vulnerable/at risk neighbors including seniors and people with underlying health issues.

This is what our neighborhood Facebook group is doing. The group includes members of about 60 households. Via a post to the group, a subset of people have volunteered to help with picking up groceries or medicines, helping with technology questions, or just checking in.

Does this sound like something your neighborhood would be interested in? Read on to see how to quickly set up a local Facebook group in a web browser.

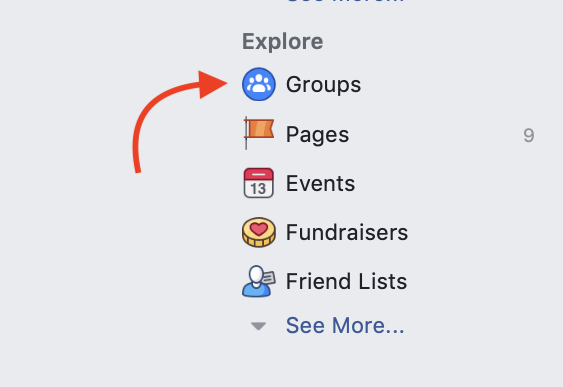
  1. Open facebook.com and select GROUPS on the left side of the page, under “Explore.”
Facebook groups

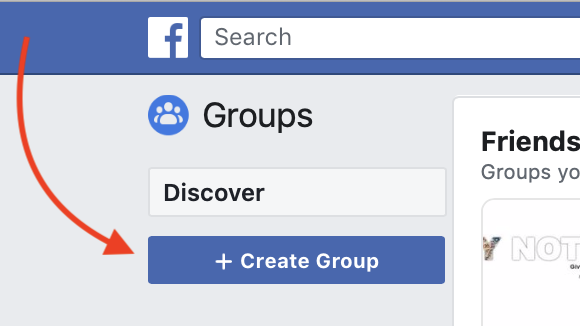
2. In the top left corner of the page, select CREATE GROUP.

Facebook create group

3. Name the group, and set privacy & visibility settings. You can also add some people from your network.

Facebook group privacy settings

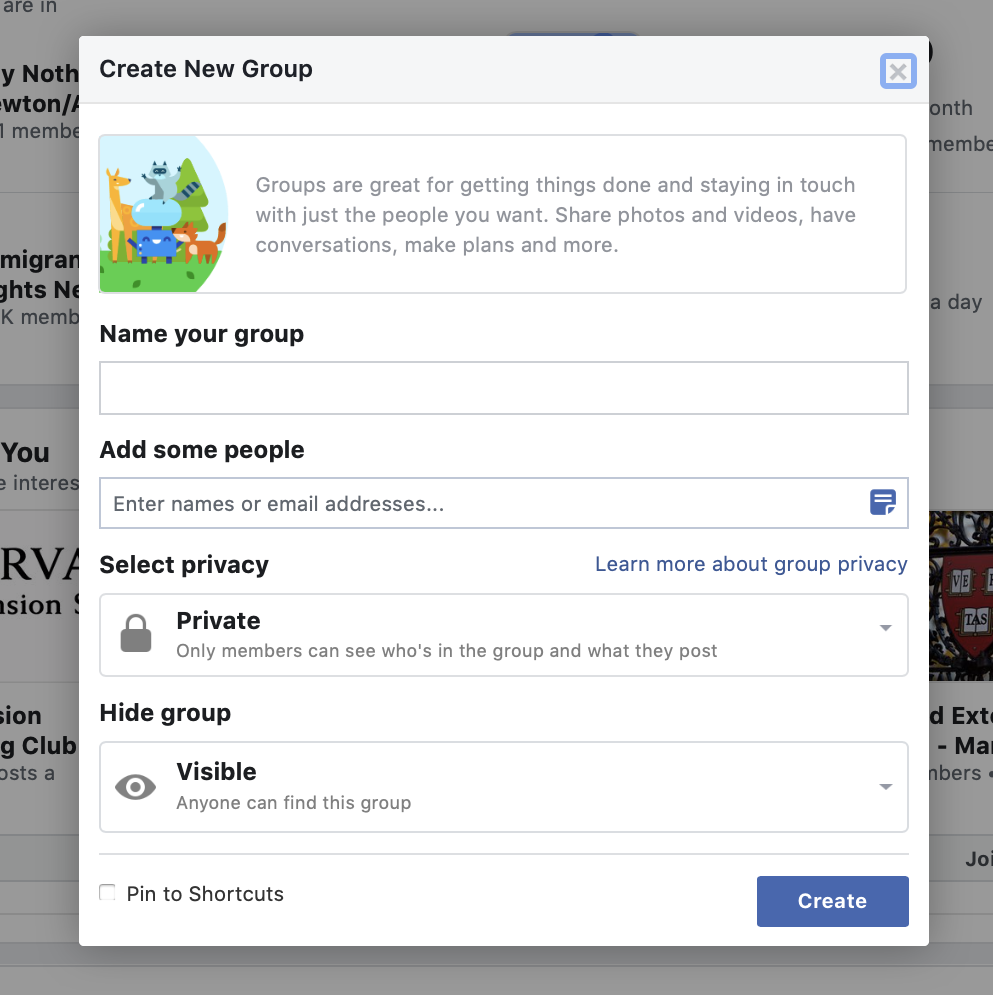
I advise keeping it really local – a street or small neighborhood as opposed to a large neighborhood or district. If it’s too large or too widely dispersed, people may be unwilling to join (“I don’t know any of these people!”) or members will be too far away to ask for or provide help.

I also advise being strict about privacy and visibility, to avoid the group being overrun by spammers. If you know everyone on your street and they are Facebook members, you can invite them to the group in the next step so you don’t have to wait for them to discover the Facebook group on their own.

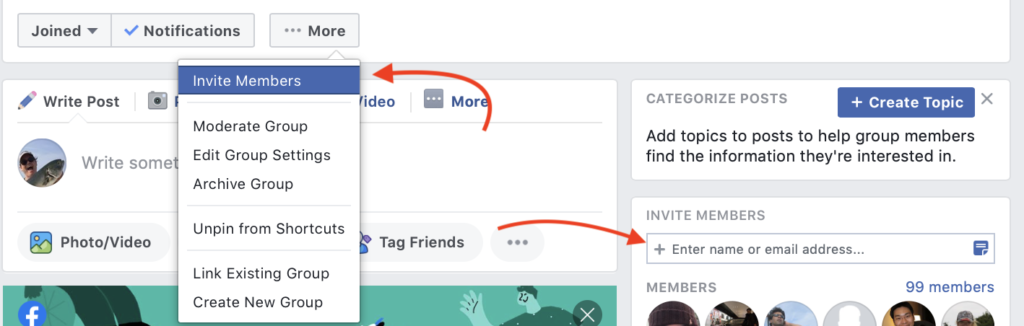
4. Invite more people by selecting MORE > INVITE MEMBERS or using the INVITE MEMBERS widget on the right side of the page.

Facebook Groups invite members

In addition to current residents, you may also want to invite adult children who have moved away. They will have a better idea of the needs of parents who still live in the old neighborhood, who may not even be on Facebook.

5. Select MORE > MODERATE GROUP to review member requests, create rules, and more. Consider adding another administrator to help you keep the group on track.

6. Other settings such as description, location, etc., can be accessed through MORE > EDIT GROUP SETTINGS.

More information about groups can be found here.

How to use the iPhone Do Not Disturb feature

By Tips

Raise your hand if you’ve ever been jolted awake by a late night phone call. Raise your other hand if it’s been a wrong number, robocall, or crank call.

You can lower your hands now, and consider the options. To avoid these nuisances, some people power down their iPhones or turn off their ringers before they go to sleep. But what if you want to keep the phone on to respond to family or work emergencies?

Do Not Disturb has your back. This feature, available via Settings > Do Not Disturb as well as the quick options panel (swipe up from the bottom of the screen), lets you silence incoming phone calls and alerts. You can manually activate it when you need it, or you can schedule it to run for a set period every day.

Do Not Disturb also lets you allow calls from people on your contacts, or contacts marked as Favorites. There is even a setting that allows repeated calls to get through, which might be useful if someone is urgently trying to get through to you from a number not on your contact list.

There are some missing features, however, such as the ability to have different Do Not Disturb schedules for different days of the week—I like to sleep in on Saturdays! In such cases, the easiest workaround is to turn off the ringer, using the Ring/Silent switch on the edge of the iPhone.

iPhone do not disturb

How to turn off iPhone notifications

By Tips

Imagine if your bedside alarm clock suddenly began to go off at random times, sometimes dozens of times per day.
That’s basically the way iPhone Notifications work. A few can be tolerated, but if you turn your back, they’ll take over your iPhone, creating a seemingly endless stream of alerts, reminders, and promotions. It’s distracting and irritating.

Accessed via Settings > Notifications or when apps are first installed, notifications can make sounds or create short messages that appear on your iPhone’s lock screen or on a small banner at the top of the screen while the device is on. There is also a Notifications screen, accessed by swiping down from the top of the screen from the Home screen or lock screen (if you see the calendar view, swipe to the right to see recent notifications):

Turn off iPhone notifications

iPhone Notifications can apply to:

  • Incoming emails, calls, and messages.
  • Activity on Facebook, Twitter, and other social networks.
  • News, weather, and stock updates.
  • Game activity and special offers.
  • Bank, credit card, and Apple Pay transactions.
  • Flight status and other travel alerts.

In theory, notifications alert you to information that matters. Practically speaking, many notifications range from useless to downright irritating. Remember, app developers generally want you to use their apps as often as possible, so notifications are designed to bring you back. Games and social media are the worst, with some apps issuing multiple alerts per day for the most banal reasons (I’m looking at you, Plants vs. Zombies 2!)

How to turn off iPhone notifications

Fortunately, the iOS operating system in your iPhone as well as many popular apps have ways of controlling what comes to you. If you find that a certain app is sending too many alerts, open the app and check the settings (look for a gear icon or three horizontal bars) to see if certain types of iPhone notifications can be turned off. For instance, some Facebook notifications are useful, such as when someone mentions you in a comment. Others are unnecessary or distracting, such as birthday reminders for all of your friends. Turn off the ones you don’t need.

A second way to turn off iPhone notifications is via Settings > Notifications. Here you can manage the way you are notified (via a message on the Lock screen, a sound, or change to the app icon) as well as turn off all notifications for a particular app or feature. Be careful here—while it may be tempting to turn off everything, you don’t want to silence critical features such as incoming phone calls or alerts from your banking app.

I also recommend turning on the iPhone’s Government Alerts, if available—these can contain critical notifications, such as extreme weather warnings or Amber Alerts.

This post was excerpted from an IN 30 MINUTES guide. To learn more, see our catalog.

Tales from the crypt: A Dropbox recovery story

By Blog, Tips

Dropbox recovery of audio filesI recently received a panicked email from a reader of Dropbox In 30 Minutes who had a question about Dropbox recovery — specifically, recovering shared files:

My name is [redacted]. I have a small recording studio in my home. I have been mixing songs for a Gospel music CD for a client over a couple of weeks. Music is being recorded in various studios around town, and when files are completing they Dropbox them to me and I mix them.

One of the studio engineers sent the files to me one night then called the next morning and ask if he could erase the files on his computer because he needed the space to record a new project. By now you may have guests what comes next. Yep. Whatever rubbed him the wrong way about the producers or the singers or ????

In about 5 days those files where deleted from Dropbox. I never had a chance to download them. Is there anyway to retrieve files that were never downloaded at my end?

There is a lot of time and money and fantastic music to be lost here. The master has to be delivered on Monday. I hate to think that legal action would be an option. I’m not even sure who’s at fault.

Wow, this sounds pretty serious. As someone who once worked in the music industry, I know that losing studio recordings is a big deal. However, in this case, I don’t think it’s necessary to bring in the lawyers, as Dropbox recovery features would likely be available. Here is my response:

Sorry to hear about the problem you are having. If you have never accessed the deleted files, you can’t access them now. HOWEVER, the person who created them CAN recover them if it’s within a certain time period (30 days for free accounts, longer for paid accounts) AND he hasn’t permanently deleted them (most people don’t know how to do this, fortunately). He can then reshare them with you.

This is what I advise:

  1. Have your collaborator log on to the Dropbox website.
  2. He should click on Files > Deleted Files and find the folder with the music files.
  3. Click the file and select RESTORE

At that point, the files will resync to his or her computer. He can reshare them from the computer or from the Dropbox website. Even if he doesn’t have room on his computer to sync the restored files, they can still be shared from the Dropbox website. The links to share will be different than the old links from 5 days ago. IMMEDIATELY sync them and import them into your mixing program so they won’t be lost again!

Good luck with your project, and send me a link to a sample when they’re mixed and mastered!

There are a few morals to this story:

  1. If someone shares important files with you on Dropbox, sync them right away and create a backup. If the owner deletes them later, there is a strong chance no one will be able to recover them. The audio engineer above was lucky, as the deletion had just occurred and even free Dropbox accounts keep “deleted” files for 30 days (unless they are permanently deleted) and the other engineer could probably recover them. But I’ve talked with people who try to get deleted files from a shared Dropbox link months after the fact, and by the it’s too late. Dropbox recovery features simply won’t be available.
  2. If you deal with important work-related files, upgrade to Dropbox Professional, which includes a terabyte of storage space and extends the recovery period to 120 days.

For more tips about how to get the most out of Dropbox, check out Dropbox In 30 Minutes.

Video: How to recover a file or folder on Dropbox.com:

Making calls with your iPhone

By Tips

On any iPhone, tapping the green phone icon opens the Phone app. Owners of newer iPhones (including iPhone 7, iPhone 8, and iPhone X) can also use Peek with a light press on the Phone app icon on the Home screen to call favorite contacts.

Once the app is open, use Keypad to make calls on the fly, but you have other options, too:

  • Favorites shows a list of contacts you have marked as favorite (when editing a contact, scroll down and tap Add to favorites to place it on the list).
  • Recents will list the most recent incoming calls. Tap the name or number to call the person back.
  • Contacts brings up your contact list. If you have added Gmail, Yahoo, or Exchange/Outlook accounts to your iPhone, and enabled the associated contact lists to be shared, those will show up in Contacts, too.
  • Voicemail shows a list of recent voicemail messages. Tap Edit to delete specific messages.

After you have entered the number and pressed the phone icon to start the call, the screen will show other options:

Mute. Turns off the microphone. Tap the microphone icon again to turn it back on.

Keypad. Brings up the keypad, in case you are using an automated system that requires additional input.

Speakers. This creates a hands-free speakerphone, useful for driving, simultaneous typing, or other situations.

Add call. Lets you create a conference call by joining other numbers to the current call.

FaceTime. Switches to the FaceTime app, which can be an audio call or a video conference. The other party will need to have a FaceTime account for this to work.

Contacts. Displays saved contacts.

You can also press the Home button to do other things (check the weather, take pictures, play Battle Monkeys, etc.) while you talk. A green bar will appear at the top of the phone’s screen while a call is in progress; tap it to return to the phone interface.

Incoming and merged calls

By default, incoming phone calls will cause the phone to vibrate, make a ringing sound, and show the incoming number on the screen (or the name, if the number is already in your contact list). You can use the on-screen buttons to answer the phone or decline the call. You can also press the On/Off button to silence the call (the caller won’t know this; it will keep ringing on their end).

iPhone calls
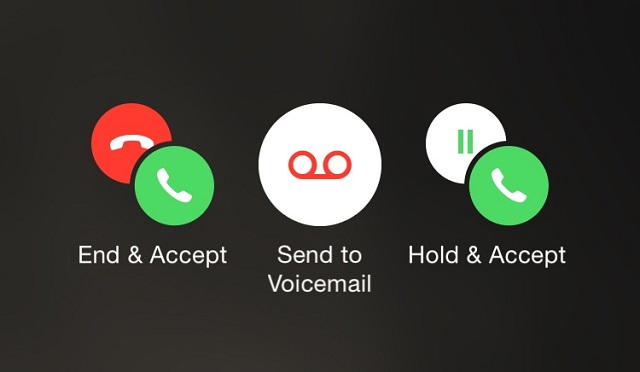
If someone calls while you are already on the phone, you will hear a beep and the screen will display the following options:

  • End & Accept. Hang up the first call, and answer the second call.
  • Send to Voicemail. The second call will be sent to voicemail.
  • Hold & Accept. The first call will be put on hold while you talk to the second caller.

If you use Hold & Accept, you will be shown options to swap back or merge the calls.