Tag

Tips

Dragging and dropping files in Google Drive to the desktop

By Blog
I had a great question from a reader of Google Drive & Docs In 30 Minutes and dragging and dropping files in Google Workspace. The reader asked:
I recently purchased a Chromebook in a move to replace my Dell Laptop using Microsoft Office. I’m in the process of going through your guide and hopefully it will help me understand the use of the Google software and some structure of the Chrome OS. My biggest hangup right now is understanding when I’m working on this computer and when I’m actually working in the cloud. I wish they labeled the Drive and My Files differently to give me that feeling where I’m at and using their software. I’m used to manipulating files, dragging and dropping, making new folders, bringing in new files via USB and email attachments, and I see that does not work in every instance here (drag/drop). It is not the feel that I’ve had for years (C: A: D: E: drives) knowing where I’m working.
I totally understand where this reader is coming from. I, too, grew up with the concept of “C drives” or “Documents” folders on desktop operating systems.
Google does things differently with Google Drive and other applications in Google Workspace. The diagram below explains the basic idea.
Google Drive concept diagram
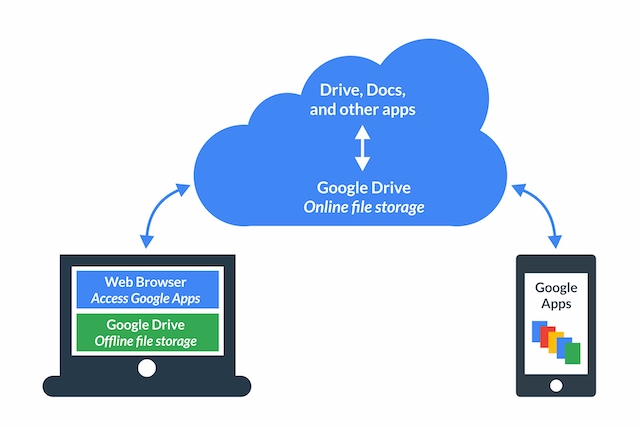
In most cases, the document you are working on is stored in Google’s cloud and is updated (via a live Internet or mobile connection) as you make changes or type. Another thing you may have noticed is larger files will take a long time to load, which is caused by the document being downloaded over the Internet. Or, if you paste in a large image, it will take a few seconds as the image is uploaded to Google and rendered in the document.
The desktop file system doesn’t really work the same way. Google Drive does have offline storage for desktop computers, which allows you to drag and drop files from different locations using File Explorer/Finder, but I have found it is buggy or imperfect on both Windows and macOS. For this reason, I use Dropbox for cloud syncing of many types of non-Google files, which works better on my desktops than Google Drive or OneDrive.
It’s worth noting that Chromebooks work differently, in that they were not designed for local file storage at all – Google really wants to you to think of the documents as living in the cloud, and not deal with downloading anything (you can do it, but it’s a pain).

How to use the iPhone Do Not Disturb feature

By Tips

Raise your hand if you’ve ever been jolted awake by a late night phone call. Raise your other hand if it’s been a wrong number, robocall, or crank call.

You can lower your hands now, and consider the options. To avoid these nuisances, some people power down their iPhones or turn off their ringers before they go to sleep. But what if you want to keep the phone on to respond to family or work emergencies?

Do Not Disturb has your back. This feature, available via Settings > Do Not Disturb as well as the quick options panel (swipe up from the bottom of the screen), lets you silence incoming phone calls and alerts. You can manually activate it when you need it, or you can schedule it to run for a set period every day.

Do Not Disturb also lets you allow calls from people on your contacts, or contacts marked as Favorites. There is even a setting that allows repeated calls to get through, which might be useful if someone is urgently trying to get through to you from a number not on your contact list.

There are some missing features, however, such as the ability to have different Do Not Disturb schedules for different days of the week—I like to sleep in on Saturdays! In such cases, the easiest workaround is to turn off the ringer, using the Ring/Silent switch on the edge of the iPhone.

iPhone do not disturb

How to turn off iPhone notifications

By Tips

Imagine if your bedside alarm clock suddenly began to go off at random times, sometimes dozens of times per day.
That’s basically the way iPhone Notifications work. A few can be tolerated, but if you turn your back, they’ll take over your iPhone, creating a seemingly endless stream of alerts, reminders, and promotions. It’s distracting and irritating.

Accessed via Settings > Notifications or when apps are first installed, notifications can make sounds or create short messages that appear on your iPhone’s lock screen or on a small banner at the top of the screen while the device is on. There is also a Notifications screen, accessed by swiping down from the top of the screen from the Home screen or lock screen (if you see the calendar view, swipe to the right to see recent notifications):

Turn off iPhone notifications

iPhone Notifications can apply to:

  • Incoming emails, calls, and messages.
  • Activity on Facebook, Twitter, and other social networks.
  • News, weather, and stock updates.
  • Game activity and special offers.
  • Bank, credit card, and Apple Pay transactions.
  • Flight status and other travel alerts.

In theory, notifications alert you to information that matters. Practically speaking, many notifications range from useless to downright irritating. Remember, app developers generally want you to use their apps as often as possible, so notifications are designed to bring you back. Games and social media are the worst, with some apps issuing multiple alerts per day for the most banal reasons (I’m looking at you, Plants vs. Zombies 2!)

How to turn off iPhone notifications

Fortunately, the iOS operating system in your iPhone as well as many popular apps have ways of controlling what comes to you. If you find that a certain app is sending too many alerts, open the app and check the settings (look for a gear icon or three horizontal bars) to see if certain types of iPhone notifications can be turned off. For instance, some Facebook notifications are useful, such as when someone mentions you in a comment. Others are unnecessary or distracting, such as birthday reminders for all of your friends. Turn off the ones you don’t need.

A second way to turn off iPhone notifications is via Settings > Notifications. Here you can manage the way you are notified (via a message on the Lock screen, a sound, or change to the app icon) as well as turn off all notifications for a particular app or feature. Be careful here—while it may be tempting to turn off everything, you don’t want to silence critical features such as incoming phone calls or alerts from your banking app.

I also recommend turning on the iPhone’s Government Alerts, if available—these can contain critical notifications, such as extreme weather warnings or Amber Alerts.

This post was excerpted from an IN 30 MINUTES guide. To learn more, see our catalog.

Making calls with your iPhone

By Tips

On any iPhone, tapping the green phone icon opens the Phone app. Owners of newer iPhones (including iPhone 7, iPhone 8, and iPhone X) can also use Peek with a light press on the Phone app icon on the Home screen to call favorite contacts.

Once the app is open, use Keypad to make calls on the fly, but you have other options, too:

  • Favorites shows a list of contacts you have marked as favorite (when editing a contact, scroll down and tap Add to favorites to place it on the list).
  • Recents will list the most recent incoming calls. Tap the name or number to call the person back.
  • Contacts brings up your contact list. If you have added Gmail, Yahoo, or Exchange/Outlook accounts to your iPhone, and enabled the associated contact lists to be shared, those will show up in Contacts, too.
  • Voicemail shows a list of recent voicemail messages. Tap Edit to delete specific messages.

After you have entered the number and pressed the phone icon to start the call, the screen will show other options:

Mute. Turns off the microphone. Tap the microphone icon again to turn it back on.

Keypad. Brings up the keypad, in case you are using an automated system that requires additional input.

Speakers. This creates a hands-free speakerphone, useful for driving, simultaneous typing, or other situations.

Add call. Lets you create a conference call by joining other numbers to the current call.

FaceTime. Switches to the FaceTime app, which can be an audio call or a video conference. The other party will need to have a FaceTime account for this to work.

Contacts. Displays saved contacts.

You can also press the Home button to do other things (check the weather, take pictures, play Battle Monkeys, etc.) while you talk. A green bar will appear at the top of the phone’s screen while a call is in progress; tap it to return to the phone interface.

Incoming and merged calls

By default, incoming phone calls will cause the phone to vibrate, make a ringing sound, and show the incoming number on the screen (or the name, if the number is already in your contact list). You can use the on-screen buttons to answer the phone or decline the call. You can also press the On/Off button to silence the call (the caller won’t know this; it will keep ringing on their end).

iPhone calls
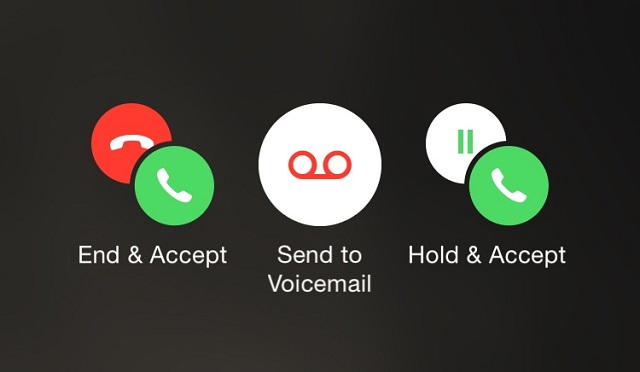
If someone calls while you are already on the phone, you will hear a beep and the screen will display the following options:

  • End & Accept. Hang up the first call, and answer the second call.
  • Send to Voicemail. The second call will be sent to voicemail.
  • Hold & Accept. The first call will be put on hold while you talk to the second caller.

If you use Hold & Accept, you will be shown options to swap back or merge the calls.

Seven easy ways to increase iPhone storage space

By Tips

iPhone storage spaceIf you own an older iPhone, or one of the less expensive newer models, you probably find yourself hitting storage limits as new apps, photos, and data take up space on the device’s storage. The following tips are not a permanent solution to the iPhone storage problem, but may offer some temporary relief:

  1. Remove apps that you seldom use. Optional Apple apps such as Keynote and Garage Band are huge storage hogs. Graphics-heavy games are also culprits; some of them take upwards of a gigabyte apiece!
  2. Go to Settings > Mail, Contacts, Calendars and check to see if an individual account (such as Gmail, or a Microsoft Exchange account) has an option called Mail days to sync. If so, lower the setting to 1 week or less. Fewer messages will be kept on the iPhone, thereby freeing up more space for other data.
  3. Open SettingsPhotos. If the iCloud Photo Library is toggled on, you will be able to select Optimize iPhone Storage. This keeps low-resolution versions of the image on the phone, while saving the high-resolution versions in Apple’s remote iCloud servers.
  4. Open the Photos app, and turn off Live Photos by pressing the circular icon. This will result in smaller photo file sizes.
  5. Under Settings >Camera, change the Record Video and Record Slo-mo options to a lower quality setting, which will result in smaller video file sizes.
  6. Go through your recent photos and videos and select those you no longer want, then tap the trashcan icon. Then, open the Photos app, go to Albums, and open Recently Deleted. The photos and videos there will be permanently removed after about a month, but you can speed up the process by selecting them and tapping Delete All.
  7. If you listen to Podcasts, mark old episodes you have already listened to as Played (tap the more actions icon that looks like three dots and select Played). Then, go to Settings > Podcasts and change the download setting to Only new and make sure Delete Played Episodes is toggled on.

These tips were excerpted from an IN 30 MINUTES guide. To learn more about the guides, browse our catalog.