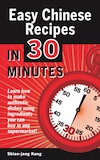
Last week, i30 Media released a new In 30 Minutes title that is remarkable in several regards. Easy Chinese Recipes In 30 Minutes by author Shiao-jang Kung is the first cookbook in the In 30 Minutes series. It’s priced at just 99 cents, another first. It’s also the first title made with iBooks Author (Apple’s authoring tool for rich media ebooks) which made it possible to embed video and other app-like elements such as photo slideshows. In this blog post, I am going to give a short iBooks Author review, covering some of the pros and cons of the tool. I also urge you to download a copy of the cookbook — it’s only 99 cents, and it will let you see what the finished product looks like and how the various rich media elements work (it’s also a great cookbook!)
I have known about iBooks Author for a few years, but never had to use it until now. Even though there are already many In 30 Minutes guides in Apple’s iBookstore, all of them were created using other production tools — namely Scrivener, which lets me export a single manuscript in various formats to multiple devices. This means I can relatively easily create an ebook that uses Amazon’s .mobi format for the Kindle, PDF versions for on-screen reading and paperback production, and books based on the ePub format, which can be uploaded to Apple’s iBookstore via Apple’s clunky iTunes Producer software.
So why turn to iBooks Author? The answer: Video. I have been producing how-to videos since 2012 on YouTube, and have wanted to bring video to my titles, but Scrivener doesn’t allow authors or editors to place video clips inside ebooks. For that matter, most other production tools don’t either. While pundits have been talking about video and app-like functionality in ebooks for years, and various ebook technical specifications support video in theory, only Apple has actually incorporated video and other rich media functionality into its production tools. I know that video and other new features will come to the Kindle and Android e-readers in the future, but I want to start experimenting now … and iBooks Author was the only tool that allowed me to do so.
iTunes Producer vs iBooks Author
I have to admit that I was a bit apprehensive about trying the tool. It wasn’t just the fact that there is no ability to export to non-Apple formats. I was worried that it would be like other Apple software for ebook production, such as iTunes Producer and iTunes Connect, which are hobbled by terrible user interfaces and error-prone, labor-intensive processes.
But Apple made a better effort with iBooks Author. It’s reminiscent of iMovie, in that the interface is pretty slick and there is a lot of dragging and dropping of elements. But as a sophisticated authoring tool that deals with lots of rich media elements and settings, there were additional complexities that were more akin to Photoshop or Pages. For instance, there is an “inspector” which allows users to tweak settings for the widgets that hold photos and videos. If you’re an experienced user of “prosumer” software, it’s not hard to get the hang of iBooks Author, but newbies can expect a steep learning curve.
iBooks Author Templates
Fortunately, iBooks Author makes it relatively easy to get started with templates. In fact, Easy Chinese Recipes In 30 Minutes was based on a cookbook template that Apple supplies with the software. This made it much easier to create individual recipe pages — I basically just copied and pasted from the text document that held Kung’s original recipes, and applied some basic formatting. The way iBooks Author is set up, titles already have formatting applied and the information (and navigation links) are flowed into the table of contents and chapter previews.
The cookbook template also had preformatted pages for text sections, such as the introduction and the special page devoted to Chinese Kitchen Gear. However, I had trouble organizing frontmatter and backmatter in the way that I wanted — for instance, the page numbering in the frontmatter was messed up (some roman numerals, and others using Arabic numbers) and I was unable to create a stanadlone conclusion without its own chapter heading.
Another issue was the cover. The template comes with a cover that contains placeholder text and an image. It’s easy enough to replace them — just type over the text and drag a new image onto the cover template. But In 30 Minutes guides use a standard cover style, which are designed by a professional graphic artist, Steve Sauer. I wanted to use Sauer’s great design, but couldn’t, because the text is part of the image, and iBooks Author wants you to manually type in the cover text so the title and author information becomes part of the TOC and uploaded metadata to the iBookstore. I was forced to do a lame recreation of Steve’s design, but may replace that in the future with a photo.
Video In iBooks Author
Video was easy to set up in iBooks Author. It basically involves adding a Media Widget from the toolbar, dragging and dropping the video from your hard drive into the widget, and then adding some title and caption information. I tested the video in iBooks Author preview mode (enabled by attaching an iPad to my MacBook Pro, opening the iBooks app on the iPad, and then going to File>Preview in iBooks Author) to make sure the quality and playability was OK.
However, one thing to consider when it comes to video is the size of the clip(s). Larger clips are not only more inconvenient to manage, they also lead to huge iBooks downloads that can be problematic for readers. Because of the video files, Easy Chinese Recipes In 30 Minutes ended up being about 70 MB in size in the iBookstore, which is 10x the size of other In 30 Minutes ebook downloads, and rivals the size of animated games in the App Store.
Because of the file size problem, I ended up doing the following:
- Created videos for just 3 or 4 recipes.
- Limited videos to just a few minutes in length
- Tried to use static shots (that is, limited panning, zooming, and following) which leads to smaller file sizes
- Limited transitions and text overlays
- Experimented with export formats in iMovie and Quicktime, before finding a format that was acceptable in terms of quality.
iBooks Author accepts various video formats, including .mov (Quicktime Movie format) and .m4v (a variant of MPEG-4 used by Apple). The clips were shot with various cameras and devices, and then edited in iMovie. What I ended up doing was creating an HD version of the clip for Web promotional purposes, and then created a smaller m4v clip for iBooks Author. There are two ways to do this:
- Use Quicktime to export/convert the HD version to “Web”, and then choose the iPhone broadband option. Quicktime will append “iPhone” to the name of the file and export as .m4v, which reduces the size of the clip to 10% of the original 720p HD file. If the HD file is 480p (or it’s converted to 480p via QT, and then converted again for iPhone broadband) the resulting size will be the same as if it were converted directly from 720p.
- From iMovie, choose “Sharing” and then the “mobile” option (which iMovie indicates will play on iPhones). It will create an .m4v file of almost the same size as the Quicktime method. This shows the size as 480 pixels wide by 272 px high, compared to 640×360 (iPod or “medium”) and 1280×720 in HD. Also, iMovie won’t create the additional assets (HTML page, screenshot, etc.) which Quicktime produces during exports.
Here’a chart which shows how the conversion process cut down the file size:
Example video: Chicken with green peppers (4 minute video, about 10 clips and titles on both ends)
- HD 720p: 316 Megabytes
- HD 480: 58 MB
- iPod: 49 MB
- iPhone (.m4v): 29 MB
The m4v files are not tiny, but at least they kept the ebook size to under 100 MB. If I had used HD video, readers would have been downloading 1 GB ebook files from the iBookstore!
Here’s what a video widget looks like in iBooks Author:

If you are interested in seeing what the m4v videos look like in the finished product, please download the book.
Photos And More iBook Widgets
Photos in iBooks Author deserve a special mention. While other ebook authoring tools (including Scrivener, Pages, and Word) support photos, the software designers behind iBooks Author really made an effort to have photos be central to the reading experience. The templates are filled with placeholder photos, and it’s easy enough to drag a new photo over them. Or, you can use the photo slideshow widget, which lets you create a touch-activated photo slideshow. The chapter templates that include static photos and the widgets look great.
I used the widget for several recipes. For instance, for Beef With Scallions, one of our testers sent me a group of photos that she had taken with her iPhone while preparing the recipe. I selected four of the best photos to create a “timeline” of making the dish.
But be prepared for a significant extra step — getting the right photos! I had anticipated the production work associated with adding videos to the ebook, but I totally underestimated the work required to get photos in iBooks Author. Each recipe required at least one photo, and they had to be well-lit, framed, and made to look nice on the countertop or table. Further, I had to pay close attention to the timing, in order to get the right shots during prep and serving. I could have outsourced this step, but it would have added a significant cost to the book plus lots of hassles arranging for multiple shoots.
There are other widgets, too, including interactive photos, simple multiple choice tests that let people review their comprehension, and an HTML widget (which apparently allow for Web-like functionality beyond linking). They looked interesting, but I did not have enough time to test them … this time!
Publishing From iBooks Author
Once your book is finished, preview it on an iPad to make sure it looks and behaves the way you want it to. Then, click File > Publish.
No, your book won’t go straight to the iBookstore. Remember that clunky piece of software I mentioned at the beginning of this blog post, iTunes Producer? You still have to go through that. Basically, iBooks Author exports a book file and metadata, which is then passed along to iTunes Producer so you can enter more data such as descriptions, categories, and prices for different markets.
The problem with iTunes Producer is processes for non-iBooks Author titles are still visible, which can be confusing (don’t try to upload a book file when prompted!) and if you make an error, you can get really hung up (as I discovered when I got a perplexing “You Have Unsaved Changes” message that took me a full day to resolve). Then there’s the review process, which typically takes a week … and if Apple finds one small problem, you have to fix it (as I did, when I was told I needed to lock the book to Landscape Mode — it’s an obscure setting in the inspector).
The Final Product
 At the end of the day, I am very happy with the results of my iBooks Author experiment. Despite some hiccups and unanticipated challenges, the tool produced a wonderful-looking ebook that includes helpful features for readers. I urge you to check out Easy Chinese Recipes In 30 Minutes in the iBookstore — it’s only 99 cents, and will let you really understand the product and reader experience.
Will I do it again? That depends not only on sales, but also on the development of other authoring tools that support video. Ideally, someone will create a tool that allows video to be exported to multiple formats, not just a format that works on the iPad. But until that happens, it looks like iBooks Author is the only game in town for authors and publishers who want to experiment with video.