Tag

Apple

How to turn off iPhone notifications

By Tips

Imagine if your bedside alarm clock suddenly began to go off at random times, sometimes dozens of times per day.
That’s basically the way iPhone Notifications work. A few can be tolerated, but if you turn your back, they’ll take over your iPhone, creating a seemingly endless stream of alerts, reminders, and promotions. It’s distracting and irritating.

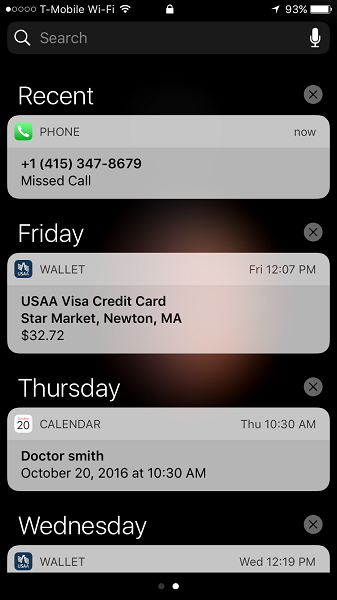
Accessed via Settings > Notifications or when apps are first installed, notifications can make sounds or create short messages that appear on your iPhone’s lock screen or on a small banner at the top of the screen while the device is on. There is also a Notifications screen, accessed by swiping down from the top of the screen from the Home screen or lock screen (if you see the calendar view, swipe to the right to see recent notifications):

Turn off iPhone notifications

iPhone Notifications can apply to:

  • Incoming emails, calls, and messages.
  • Activity on Facebook, Twitter, and other social networks.
  • News, weather, and stock updates.
  • Game activity and special offers.
  • Bank, credit card, and Apple Pay transactions.
  • Flight status and other travel alerts.

In theory, notifications alert you to information that matters. Practically speaking, many notifications range from useless to downright irritating. Remember, app developers generally want you to use their apps as often as possible, so notifications are designed to bring you back. Games and social media are the worst, with some apps issuing multiple alerts per day for the most banal reasons (I’m looking at you, Plants vs. Zombies 2!)

How to turn off iPhone notifications

Fortunately, the iOS operating system in your iPhone as well as many popular apps have ways of controlling what comes to you. If you find that a certain app is sending too many alerts, open the app and check the settings (look for a gear icon or three horizontal bars) to see if certain types of iPhone notifications can be turned off. For instance, some Facebook notifications are useful, such as when someone mentions you in a comment. Others are unnecessary or distracting, such as birthday reminders for all of your friends. Turn off the ones you don’t need.

A second way to turn off iPhone notifications is via Settings > Notifications. Here you can manage the way you are notified (via a message on the Lock screen, a sound, or change to the app icon) as well as turn off all notifications for a particular app or feature. Be careful here—while it may be tempting to turn off everything, you don’t want to silence critical features such as incoming phone calls or alerts from your banking app.

I also recommend turning on the iPhone’s Government Alerts, if available—these can contain critical notifications, such as extreme weather warnings or Amber Alerts.

This post was excerpted from an IN 30 MINUTES guide. To learn more, see our catalog.

Seven easy ways to increase iPhone storage space

By Tips

iPhone storage spaceIf you own an older iPhone, or one of the less expensive newer models, you probably find yourself hitting storage limits as new apps, photos, and data take up space on the device’s storage. The following tips are not a permanent solution to the iPhone storage problem, but may offer some temporary relief:

  1. Remove apps that you seldom use. Optional Apple apps such as Keynote and Garage Band are huge storage hogs. Graphics-heavy games are also culprits; some of them take upwards of a gigabyte apiece!
  2. Go to Settings > Mail, Contacts, Calendars and check to see if an individual account (such as Gmail, or a Microsoft Exchange account) has an option called Mail days to sync. If so, lower the setting to 1 week or less. Fewer messages will be kept on the iPhone, thereby freeing up more space for other data.
  3. Open SettingsPhotos. If the iCloud Photo Library is toggled on, you will be able to select Optimize iPhone Storage. This keeps low-resolution versions of the image on the phone, while saving the high-resolution versions in Apple’s remote iCloud servers.
  4. Open the Photos app, and turn off Live Photos by pressing the circular icon. This will result in smaller photo file sizes.
  5. Under Settings >Camera, change the Record Video and Record Slo-mo options to a lower quality setting, which will result in smaller video file sizes.
  6. Go through your recent photos and videos and select those you no longer want, then tap the trashcan icon. Then, open the Photos app, go to Albums, and open Recently Deleted. The photos and videos there will be permanently removed after about a month, but you can speed up the process by selecting them and tapping Delete All.
  7. If you listen to Podcasts, mark old episodes you have already listened to as Played (tap the more actions icon that looks like three dots and select Played). Then, go to Settings > Podcasts and change the download setting to Only new and make sure Delete Played Episodes is toggled on.

These tips were excerpted from an IN 30 MINUTES guide. To learn more about the guides, browse our catalog.

Touch screen basics for new iPhones

By Tips

If you getting a new iPhone, you may wonder how a device without a physical keyboard can do everything from checking your bank balances to telling your Facebook friends about your daughter’s birthday party. The answer: It’s all in the touch screen. The following post explains how to use touch screens on new iPhones (including the iPhone 7, iPhone 8 and iPhone 10). Some of the instructions will be valid for older iPhones as well.

The iPhone touch screen lets you press virtual buttons, enter text on a pop-up virtual keyboard, and use other types of gestures, including:

  • Force Touch. Pressing and holding a finger on the screen can place the cursor in a document or email, select an area or object, or mark an item for cutting, copying, and pasting. Force Touch can also be used to remove apps from the phone (see Chapter 4, ).
  • Swiping and Brushing a finger across the screen allows for horizontal browsing (for instance, to see the next picture in a photo album) or vertical scrolling (useful in the iPhone’s browser, if you want to read to the bottom of a long article or page). Flicking can be used in book apps to flip through the pages, and some games even use swiping for special actions such as slicing tossed fruit (no joke—this is the object of a game called Fruit Ninja).
  • Double-tapping. In email, double-tapping text will highlight text and give you the option of copying, cutting, and pasting. In games and other apps, double-tapping might allow certain moves or special functions.
  • Dragging is a combination of holding and swiping, and is similar to “dragging” an item with a mouse on a desktop computer. Try it by holding down one of the app icons for two seconds. Without letting it go, drag it to the right side of the screen. The icon will follow your finger and will eventually be dragged over to the next pane of the Home screen. Let go of the icon, and the icon will be deposited on the new pane.
  • Zooming. This gesture is commonly used for zooming in and out, which can be useful for examining photos or maps. To zoom in, place the tips of two fingers or a finger and a thumb next to each other on the screen, and then spread the digits. To zoom out, do the reverse.

Many gestures and touch-related actions are contextual. That means a gesture may be assigned different functions, depending on the app that is being used. Fortunately, some gestures are nearly universal. For instance, the swiping gesture rarely changes from app to app (Fruit Ninja being one amusing exception!)

3D Touch, Peek, and Pop

All newer iPhones have additional touch screen actions, which Apple collectively calls 3D Touch. The touch screens on these newer models are able to differentiate between taps, light pressure (Peek), and heavy pressure (Pop). Peek generally previews content or provides additional options, whereas Pop will open the content.

Here are some examples of how Peek and Pop work:

  • From the Home screen, light pressure on an app icon will reveal a menu of Quick Action options for that app.
  • When reviewing the list of email in your inbox, light pressure on a particular message will preview it, while heavy pressure will open up the message.
  • While browsing photos and videos in the Photos app, use Peek on a single image to open it up for preview.
  • From your list of contacts, Peek will let you quickly mail, message, or call someone.
  • In Maps, use Peek to preview a business or organization, share its location, start driving directions, or browse contacts in your favorites (see the image below).

iPhone 7 Plus Peek favorites iPhone touch screenHowever, there are some drawbacks to 3D Touch:

  • It takes some getting used to. Press too hard or too softly, and it may not work as expected.
  • Apple Apps widely incorporate 3D Touch, as do some popular apps such as Instagram. However, not all apps support 3D Touch.
  • For certain apps, there does not seem to be much of a point to Peek or Pop—for instance, why bother using 3D Touch to preview or open a photo when it is already so easy to use the touch screen to open it?

Nevertheless, some apps are really improved by the addition of 3D Touch, such as Contacts. If you own a newer iPhone model, play around with 3D Touch to determine which apps work best with the new touch screen technology.

This post was excerpted from an IN 30 MINUTES guide.

Announcing an updated version of our unofficial iPhone user guide

By News

Publisher i30 Media has released an updated version of its iPhone user guide. Authored by Ian Lamont, iPhone Basics In 30 Minutes covers the current iPhone hardware lineup including the iPhone 6S, iPhone 6S Plus, iPhone 7, iPhone 7 Plus, and the iPhone SE. It also explores the iOS operating system, Apple services such as iCloud and Siri, and important apps such as Phone, Photos, Mail, and Maps. Finally, it provides reviews of nine powerful apps that many new iPhone owners may never have heard of, such as Waze and Wunderlist.

Written in plain English with a touch of humor and lots of images, this iPhone user guide covers basic setup, key hardware and software features, and various tricks and time-savers. Topics include:

  • How to customize the iPhone’s appearance
  • What users need to know if about migrating from Android
  • Touch screen basics
  • 3D Touch, Peek, and Pop
  • Switching apps and multitasking
  • Typing and text tricks
  • How to use Siri and its kid brother, Dictation
  • Getting the most out of the powerful iPhone camera
  • Managing iCloud settings
  • Security features, from Find My iPhone to Touch ID
  • Wi-Fi and other wireless settings
  • How to tame notifications and after-hours calls
  • Moving, deleting, and grouping apps
  • Four ways to conserve battery power
  • Seven ways to free up iPhone storage space
  • Nine exceptional iPhone apps

Not a comprehensive iPhone user guide

As its name suggests, iPhone Basics In 30 Minutes does not cover everything about the iPhone. Nevertheless, in a single reading readers will discover new features and learn time-saving shortcuts. The guide also explains how to leverage the iPhone’s increasingly powerful camera and photo-organizing software.

iPhone user guide camera tipsiPhone Basics In 30 Minutes contains updated text and imagery from an earlier title, iPhone 6 and 6S In 30 Minutes, but has been significantly revised to take into account Apple’s new iPhone models and updates to the iOS operating system.

Here’s what real readers have said about the guides:

John Steel:

“A really useful guide full of hints tips and information. You can save yourself a lot of money by following the clear instructions over usage. I would still be struggling to use the phone to its full potential without this book. Highly recommended.”

Gary Coates:

“Great help for Android users wondering where all the functionality has gone when using an iPhone for the first time.”

To learn more about the title, or to purchase the ebook, PDF, or paperback editions, visit the In 30 Minutes online shop listing for iPhone Basics In 30 Minutes. The book will be updated as Apple releases new hardware and software.

Working with Photos and iCloud Photo Library on macOS/OS X

By Blog

When it comes to photos, the digital revolution has been a blessing and a curse. It is so darned easy to take photos, yet it’s so *&^$% hard to organize them. A lot of people either don’t know how to transfer photos from their smartphones and cameras to computers and tablets — or they can’t be bothered. Who wants to deal with cables, import settings, albums, and all of the other details? Apple has tried to take away some of the pain with Photos, the photo organizing application for OS X (soon to be renamed macOS?), as well as iCloud Photo Library, a cloud-based photo storage service.

Photos for macOS/OS X is closely integrated with the Photos app on iOS devices such as the iPhone and iPad (the mobile version of the app is described in more detail in our iPhone In 30 Minutes book):

photos app iPhone

The Photos app on an iPhone.

Photos replaces iPhoto, an older Apple photo editing app for Macs. If you are using an older Mac and upgrade to the latest version of OS X, Photos will be installed and old iPhoto collections will be migrated to the new application, along with any albums created in iPhoto. Here’s what you need to know when it comes to using Photos:

  • Select the Photos tab to see all photos and videos organized by date taken and location (if location data has been added). If you use an iPhone or iPad, you may also see Photo Stream images, a free service which automatically uploads to iCloud up to 1,000 photos taken on your mobile devices and then shares them on any other Mac, iPhone, or iPad connected to the same iCloud account.
  • Shared is part of iCloud Photo Sharing, an optional service that lets you share photos and videos with friends and relatives, including people who do not have Apple devices — albums are visible on the Web, and people can leave comments. As iCloud Photo Sharing is similar to photo-sharing features found in Facebook, Line, and other social networks, it may not be worth activating. On the other hand, it lets you work with existing photos without having to upload them to a separate service.      
  • Under the Albums tab are photo albums you have created (press the “+” symbol to make a new album), as well as views of videos, the most recent import, and Photo Stream.
  • Projects is an underappreciated paid service that lets users create photo books, cards, calendars, and prints. Select photos in the Photos or Albums view, and then click the “+” button. The cost varies, but the quality is good. The books and prints are an excellent way to preserve the best photos in your albums.
  • iCloud Photo Library is a service that syncs photos and videos on all devices using iCloud. So, if you take a photo on your iPhone, a copy of the photo will be uploaded to iCloud and then distributed to your Mac, your iPad, and any other device connected to the same iCloud account. If you edit the photo on one device, the changes will be reflected on all other connected devices.

Photo Stream vs. iCloud Photo Library

Unlike Photo Stream, which stores only a limited number of photos, iCloud Photo Library can store all the photos and videos you add to the account, up to the storage levels you have paid for in your iCloud account. While every iCloud account comes with a limited amount of free storage, it’s not enough to hold a lot of photos or videos, especially if you are constantly taking photos with an iPhone camera.

To activate iCloud Photo Library on your Mac, go to Photos > Preferences > iCloud and check the box for iCloud Photo Library. To add more storage space, open Apple Menu > System Preferences > iCloud and select iCloud Drive. There are several paid tiers:

iCloud Photo Library paid tiers

iCloud Photo Library: Paid tiers

Once activated, photos taken on your iPhone or uploaded or transferred to your Mac will be accessible on every other connected device.