Category

Blog

How to preserve blockquote formatting in Scrivener .mobi and .epub exports

By Blog

I spent an hour or two this morning dealing with a pesky problem: Figuring out how to get blockquote text to indent in MOBI and EPUB file formats exported during a Scrivener compile. Like many things in Scrivener, there is an easy solution, but it’s buried deep in an obscure settings pane. This blog post explains how to access it.

A little background: I am preparing for publication the next In 30 Minutes title, LinkedIn In 30 Minutes by author Melanie Pinola. In her manuscript, Melanie marked several pieces of text with HTML <blockquote> tags. I converted these to the blockquote style preset during the editing process in Scrivener. In Scrivener’s editing window, the text properly indented. But when I compiled the .mobi version, the blockquoted text did not indent in the Amazon Kindle. When I exported an .epub version, the blockquoted text also appeared “normal” when I viewed it on the iPad.

Why wasn’t it indenting? I scoured Scrivener’s help forum and various blogs, but no one had written about this problem. I also fiddled around with the compile settings. In the Formatting pane, there didn’t appear to be a way to treat different types of text in a single binder file with different styling. The Transformations pane did not contain the options either.

Finally, I found this note on page 355 (!) of the Scrivener user manual:

Text Override Formatting Options

This section of the options panel lets you specify just how much formatting should be changed in the source documents. Note that if you use these, any respective styling you’ve done in the formatting editor will be ignored. For example, if you set the option to preserve line-spacing, then adding double-spacing in the formatting editor will do nothing. Access to this section will be disabled unless “Override text and notes formatting” is enabled.

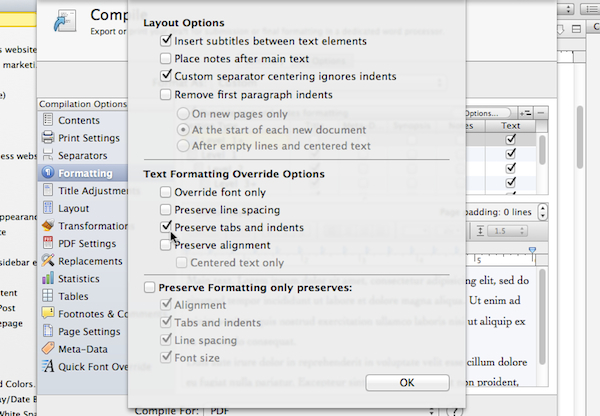
This setting can be accessed in the compile settings, Formatting pane. Make sure “Override Text And Notes Formatting” is selected. Then click the tiny “Options” button near the top, and then select “Preserve Tabs And Indents”. Here’s the screenshot of what you should see, with the arrows pointing at the Options button and checkbox that needs to be selected:

Scrivener blockquote and indentation settings

I recompiled, and the problem was solved. Let there be blockquoted text!


Like home-style Chinese cooking? Sign up now!

By Blog

The upcoming In 30 Minutes title on Chinese food is all about home-style Chinese cooking you can prepare in 30 minutes or less! Forget about obscure ingredients — author Shiao-jang Kung uses healthy Asian flavorings you can get at ANY American supermarket, such as scallions, soy sauce, and ginger. There are chicken, pork, seafood, and vegetable recipes that your family will love!

Let me know when this title is released!

(We will not share or sell your email address with anybody)

* indicates required


What do you like most about this title?

B&N’s strategy with Nook Press: Own the editorial process

By Blog, Industry

This morning, I received Barnes & Noble’s official announcement of Nook Press. There has been a lot of speculation about B&N’s intentions for the Nook and Pubit (its self-publishing platform, akin to Amazon KDP), but the email made it clear that B&N’s main aim is to “own” the editorial process.

The first three bullets list the following features of Nook Press:

  • NEW! One-stop Publishing Solution: Write, edit, format and publish your eBooks in our web-based platform, instantly reaching millions of NOOK customers within 72 hours.
  • NEW! Easy ePub Creation and Editing: Upload your manuscript file and make changes directly in NOOK Press. Editing and previewing in one session saves you time and effort.
  • NEW! Integrated Collaboration: Collaborate with editors, copyeditors, and friends, allowing them to review and comment on your manuscript without ever leaving NOOK Press.

In other words, what B&N wants authors to start doing is having the editorial processes take place inside the Nook platform. This potentially replaces the hodge-podge of processes and tools that authors use now, such as:

  • Writing manuscripts in Word, Pages, Google Docs or Scrivener
  • Collaborating with other authors/editors using Email, Dropbox, Google Drive, and other tools
  • Creating/modifying ePub files using Scrivener, Pages, Sigil, Smashwords, etc.

It’s important to note that no one really owns this space, especially the 800-pound gorilla whose name begins with A and ends with N. If you asked 10 independent authors about their editorial workflows, I suspect you’d get 10 different answers, with a heavy emphasis on Word, email, and Smashwords.

Nook PressStrategically, it’s a savvy move. While Scrivener, Sigil, and a few other professional authoring and publishing tools exist, they are do not incorporate collaborative editing processes and require some technical skills to use. If Nook Press works as advertised and B&N can convince authors to start writing and editing books inside of Nook Press, it could result in A) author “lock in” B) more content for the Nook platform and C) more power for B&N to fight the Amazon juggernaut.

But that’s a big “if”. I only gave it a quick spin, testing the .ePub export function (I wanted to see if it inserted Nook metadata into existing ePub files, and was unable to find any, which is a good thing). However, I am not going to use Nook Press for writing or editing in the near term. I am happy with my current toolset (based on Dropbox, Google Drive, and Scrivener), and am concerned about bugs or other early problems with the tool. In addition, I don’t want to force my copy editor and collaborators to learn a new tool — Google Docs and Word work well enough.

Easy Chinese recipe for Red-Braised Pork (紅燒肉)

By Blog, Video

Easy chinese recipe for braised porkThe latest recipe for Chinese Cooking In 30 Minutes is ready! Last week, we showcased the recipe and video for Shiao-jang Kung’s Soy-Braised Salmon (蔥燒鮭魚). We got some great feedback from testers. This week, we’d like you to try home-style Red-Braised Pork (紅燒肉). Like all recipes in the book, it’s designed to be cooked in 30 minutes or less, and uses healthy, simple ingredients you can find in ANY American supermarket. The full recipe is below. If you want to be notified when this title and other In 30 Minutes guides are released, please enter your email address in the following form:


The full recipe follows. If you try it out, please let us know how it worked. We are particularly interested in:

  • Type of pork used (ribs, chops, etc.)
  • Type of pot used
  • Cooking times

Leave comments at the bottom of this page.

Recipe for Red-Braised Pork/紅燒肉

Ingredients

  • Two tablespoons vegetable or peanut oil
  • Two scallions, ends trimmed off
  • Two medium onions, roughly chopped into slivers about the width of a pencil
  • 2-4 garlic cloves, crushed
  • One to two-inch stub of ginger, sliced into strips about the width of a quarter
  • 1/2 teaspoon white or brown sugar (or one tablespoon rock sugar or Japanese Mirin)
  • 1/4 cup soy sauce
  • If using frozen meat, 1/4 cup beer or wine (or Chinese rice wine, if you have it). If the meat is fresh or thawed, use 1/2 cup.
  • 2 pounds of pork ribs (bone-in or “country style”). If you don’t have ribs, use pork chops or pork sirloin. Darker meat will be more tender, while white meat is more lean. Frozen pork is OK, but you will need to cook it longer (see notes, below).
  • Optional: One tomato, chopped into eighths. Add this after the pork is placed in the pot.
  • Four medium carrots, chopped into rough pieces about an inch long. Or substitute green beans with the ends chopped off, or 3 or 4 cabbage leaves, chopped into inch-wide strips.

Note on timing: If you are using fresh or unfrozen pork, this dish can be prepared and cooked in 30 minutes. If you are using unthawed frozen pork, give it 45 minutes. Note that you can simmer it beyond these times to make the meat more tender.

Directions

Get all of the ingredients ready. This should take five minutes — the pork does not need to be sliced or even thawed! If you are serving it with rice, start cooking that, too.

Get a large iron pot, turn on the heat to medium-high, and add the oil. Add the scallions, onions, ginger, and garlic, and stir them around until they are coated with oil.

The mixture will soon start to sizzle. Stir it around so it doesn’t burn. After 4-5 minutes in the pot, it should be very fragrant. Place the meat on top of it, then add the soy, beer/wine, and sugar. If the meat is frozen it may not lie flat in the pot, but don’t worry — as it thaws it will fall into the liquid. Add the tomato (optional) at this point, but not the other vegetables.

Turn the heat down to medium and cover. After 5-10 minutes, lift the lid and check. It should be bubbling. If you are using frozen meat pieces, use a wooden spoon to separate them and push them down so they are lying flat, almost covered with liquid. Frozen pork will throw off enough liquid to cover. Fresh pork wont, so if too much pork is poking out of the liquid, add another 1/4 to 1/2 cup of water or beer so the meat is mostly submerged.

Cook covered for ten more minutes. By now the pork will be cooked through. Taste the broth. Is it flavorful enough? If not, add another tablespoon of soy. Using a wooden spoon, break apart the meat if the pieces are too large (this will be easier to do the longer it’s cooked).

If you are using fresh pork, add the carrots, green beans, or other chopped vegetables. Cover and cook for 5 minutes. If the vegetables are the right texture for you, turn off the heat and serve.

If you are using frozen pork, this will take longer — heat covered for another 10-15 minutes, then lift the lid and add the vegetables.

Note that if you want more tender pork, have it cook for another 15-30 minutes (hold off adding the vegetables until the end). If you do cook it longer, make sure the pork stays partially covered with liquid — add small amounts of water, beer or wine as needed.

Video:

Why I moved my book websites from Blogger to WordPress (with examples)

By Blog, Industry

Since incorporating my ebook venture at the beginning of this year, I have spent a lot of time (maybe too much time) updating the online presences for various In 30 Minutes™ guides and videos. This has involved several steps, including 1) Migrating certain pieces of content from the old Blogger websites to the new WordPress sites and 2) creating new content for the new websites (for example, the new “What Is Google Drive?” webpage that I created for the product website for “Google Drive & Docs In 30 Minutes” earlier today).

In this post, I am not going to get into the nitty-gritty details of the steps involved in migrating content or setting up a WordPress site. Rather, the focus is on why I moved the book websites from Blogger to WordPress, particularly considering the Blogger-based sites were only six months old.

I have several reasons why I started with Blogger:

  1. The original Blogger sites were set up as experiments. In the summer of 2012, I launched the ebook venture, having no idea if it would be a success. I needed a flexible, low-risk website solution — and Blogger fit the bill. If it didn’t work out, I’d only be out a small amount of money ($10 per site) and a few hours of time per site.
  2. Blogger-based sites are much easier to set up than WordPress. A basic site can be whipped up in an hour or two, and I developed a few “hacks” (described in Google Blogger For Small Businesses In 30 Minutes) to make static product sites using Blogger.
  3. Sites with hosted domains on Blogger are cheaper than WordPress. A dot.com website costs just $10 for the domain and hosting is free and robust (I’ve had pages that have been slashdotted and they never go down!). WordPress domains can be had for the same price, but hosting is $30-$40 per year … or more, if you need additional bandwidth.
  4. I didn’t know if the In 30 Minutes “brand” would be dropped in favor of something else. I actually tried another brand for one title (“The Rogue Manual”) and considered others, including “In 20 Minutes” and “In 33 Minutes” (don’t ask!). Creating WordPress sites for each brand type would be expensive and time-consuming.

These are the reasons I started with Blogger. However, I should note that when I created the product sites on Blogger, I knew that I might migrate them to WordPress if the idea took off. Why? In a nutshell, Blogger is an imperfect solution. It may be cheap and easy to set up, but the templates don’t look great. Further, while the functionality is sufficient for creating online content, adding product links and buttons, and performing other basic tasks, WordPress takes things to a much higher level. I knew from working on WordPress blogs in the past that there are some gorgeous WP themes available, as well as plug-ins and other tools that can really supercharge websites.

What eventually happened? I launched my product sites on Blogger starting in the summer of 2012. Here’s what the old product site for “Google Drive & Docs In 30 Minutes” looked like:

Google Drive old site

As you can see, it covered the basics — a cover image, pricing, buttons to buy the ebook/paperback, etc. Even though I started to get some sales through the website, the appearance bothered me. It was nowhere near the quality and professionalism of the actual book cover for “Google Drive & Docs In 30 Minutes”, which was handled by a professional graphic designer in Rhode Island. I worried that the poor Blogger templates might be turning some potential customers away.

In early 2013, it was clear that the In 30 Minutes concept was working. I was selling hundreds of ebooks and paperbacks, and had been profitable since the second month of operations. I incorporated and decided to move the official product sites to In30Minutes.com, using subdomains for each one of the titles. I found a good theme for the master site (In30Minutes.com), and then strong product themes with a solid call-to-action for individual titles on the subdomains. Here’s what googledrive.in30minutes.com looks like now:

Google Drive user guide

All of the other titles are using the same theme (Responsive, which I have modified using child themes). For most of the WordPress product sites, I have added “buy” and “author” pages. Most of the product sites have individual blogs devoted to the topics covered in the guides, which mostly contain text posts and videos that can help readers. I also added several WordPress plugins, one of which has no equivalent in Blogger.

However, I haven’t deleted the old Blogger sites yet. The main reason is they still get traffic. For people hitting the old sites, when it comes time for them to make a purchase I link off to the “Buy” pages on the new sites. In the future, I may add 301 redirects, but want to make sure I have everything ready on the new sites before I throw the switch.

For other authors reading this post, have you considered WordPress for your book or author sites? Why or why not?